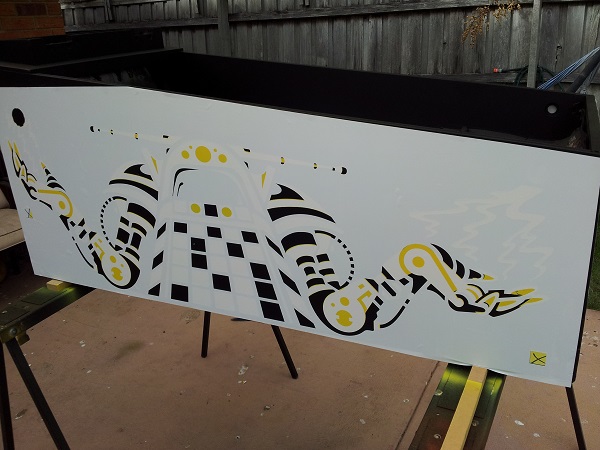
After the Twisted Pins drama, it’s good to be bringing the cabinet work on Pinbot to completion. I’m tempted to do a write up comparison between the two different sets of stencils to highlight the pros and cons. But i’ll save that for another day. For now, it’s time to finish off the cabinet and get the machine back together. At the end of the previous post, I had sanded off the paint from the Twisted Pins stencils and repainted the black. The yellow layer was done first. This stencil layer has two registration marks which it leaves on the cabinet when pealed off. This is an incredibly easy system to use and get right. I like that Pinball Pimp has included these as it makes lining up the second layer easy. The stencils also have the correct bleed and traps, which means the final result will look accurate. Here the second stencil has been lined up and is ready for the red paint.
restoration
All posts tagged restoration
While I haven’t quite finished my previous (or should I say current) project – Pinbot, a new project popped up a few weeks ago that felt like a good opportunity – so I grabbed it. This time, I’ll be looking at a Counterforce machine by Gottlieb. It’s part of the Star 80 series and was released back in 1980. This particular machine started life in Italy, before being imported here to Australia. I was attracted to it as the gameplay looks kind of neat – seems like a mash of missile command and space invaders played out on a pinball playfield. Plus it’s an opportunity to work on a System 80 machine, which is something I’ve not yet done – so it should be an interesting experience. My last few projects have been restorations where I’ve spent a bit of money doing them up. But this project will be a little different. Due to the damage on the playfield, the machine won’t gain much value with everything else restored around it. The detail in the artwork makes it impossible to paint or touch up. Therefore, my plan is to keep spending limited. Any worn or damaged parts considered important will be replaced (globes, rubbers, broken drop targets, coil sleeves, etc). Anything that is still usable will be cleaned up and put back into the machine. So the goal here is to service all parts of the the machine, clean it up (wow does it need a clean) and repair anything broken to make it a fully functional game once again. I’ve set myself a reasonable budget to prevent over capitalising on it, but I may run into some nasty surprises along the way. So we’ll see how that turns out 🙂
Continue Reading
It’s time to finally post another update on my Pinbot restoration. Over 2 months since my last post, and it feels like much longer. I was well underway with the cabinet restore when I encountered an issue with the stencil kit purchased from Twisted Pins. I did a detailed write up of the experience – which you can read about here: http://www.enteryourinitials.com/2015/05/07/twisted-pins-customer-service-is-horrible/. As a brief summary – avoid buying from them if you can – Travis is not worth dealing with and the stencils are not good quality. Look to Pinball Pimp and Flipper Rescue for their stencils first as the quality is much higher and the guys running those businesses are much better to deal with (especially if there is an issue). I had originally planned to make the cabinet restore a single post. But due to the issues encountered and the time it’s taking, I’ve decided to cover the cabinet restoration across a couple of posts. So time to dive in and chart the progress so far.
The starting point. The left side of the cabinet is the hardest hit in terms of damage. There are a few nice chunks taken out and plenty of scratches and scrapes of varying degrees. For many people, this state is more than reasonable. If it was another machine, I’d probably leave it. But this is Pinbot and a machine I love – so I’m keen to go the extra yards and make it beautiful again. The cabinet is still very solid, which is an excellent starting point. After some patching and repainting, it’s going to look awesome (I hope).
Update – Decided to sticky this and also add direct links to threads on Aussie Arcade and Pinside highlighting the negative dealings people have had with Twisted Pins and Travis.
Thread on Aussie Arcade forums – Link
Thread on Pinside forums (Appended to an existing thread)- Link
Originally posted May 7th, 2015.
After a very poor experience with Twisted Pins over the last month, I’ve decided to write up the details for others as a warning. If you must order from them, be aware they don’t have the strongest reputation (as I’ve since heard and now experienced). In fact after some searching, I’ve found a number of people have a very negative view of Twisted Pins and the guy who runs it – Travis Brawley. No doubt people order from them without issue. But if there is an issue with your stencils (as I found with mine), you may not get any support – regardless of where the fault lay.
Continue Reading
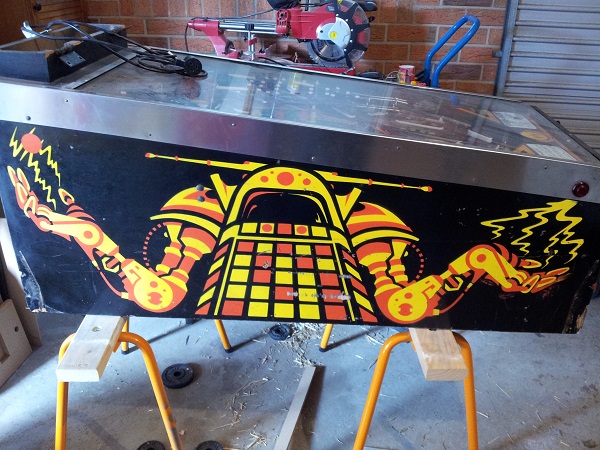
This update took much longer than I expected it would, but finally the headbox has been patched and repainted. Outside of some cosmetic damage, the headbox is in good condition. While the artwork was faded in parts and there was some minor damage to the wood, it was at least strong and stable. Unlike the Fireball Classic I recently restored, the Pinbot cabinet artwork is painted on with the use of stencils. A full set are available at TwistedPins and Santa managed to deliver a set to me during the Xmas period and it was time to put them to use.
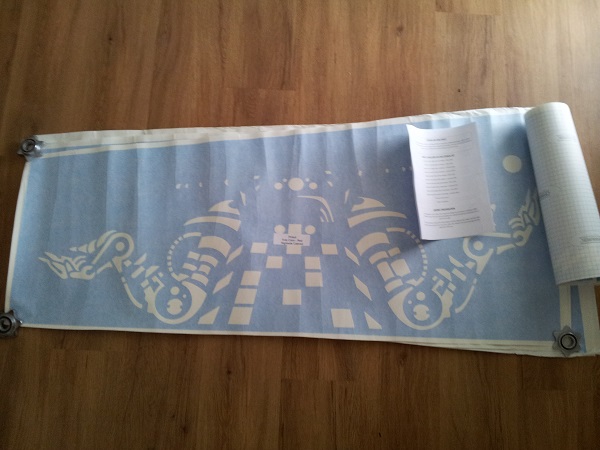
I’m going to break the process up into two parts. Firstly i’ll do the headbox, which will then be followed by the cabinet. To begin with, I removed the stencils from the packaging and flattened them out. There are two stencils per side – one for the red/orange colour and the second for the yellow. It also comes with a set of instructions which are not complicated – just common sense really.