Pole Position 2 Restoration

Documenting the restoration of a Pole Position 2 arcade cockpit

Today, I finally completed the project. After having the machine split in 2 (thus unplayable) for so many months, I put the finishing touches on the front half today and joined it all back up for a game.

The first step was to remove the existing decals from both the left and right front panels. As it was, some of the decals had already come off. In some places there were chips missing from the side panels and even what look like burn marks (assuming cigarette).

Left panel start
Continue Reading

It’s been awhile since my last update on my Pole Position cockpit restoration. With some Christmas holidays on my side, I decided to start working towards completion. Over the last few months I had been gathering the last bits I needed to complete the project. The artwork arrived, the paint was purchased and a few minor parts were sourced. There was still quite a bit to do on the machine, so I decided to split the remaining work into two sections – basically the front half and back half of the cockpit.

To start with, I decided to focus on the back half of the cockpit and get that 100% complete.

The first step was to fix up the broken corners on both side panels. These had broken off at some point in the past – maybe by vandals, maybe just from movement between owners or locations. Anyway, some builders bog came in handy here to redo the curved corner. Once it had set, I used the router to cut a new t moulding slot (not shown).

Broken corner fixed
Continue Reading

Something I’ve wanted to get around to for awhile was giving some attention to the pedal assembly. I mentioned in an earlier post some issues I saw with it, and figured I would make the time to deal with it now while waiting for artwork and t-moulding to arrive.

When I tested the machine out before buying it, I did some light testing of the pedals (among other things). Both pressed OK, although could use some servicing. Trying them out in game, the accelerator worked fine as I could race around the track. The brake pedal seemed to be OK too as my car would slow down, although not as quickly as I expected. The machine was being sold as 100% working, so I left it at that, with the knowledge I’d need to give the pedals a clean and some grease/oil..

After getting it home and starting work on it, I eventually got my head into the back of the cockpit and began to inspect the machine much more closely. I decide to put the game into test mode (there is a handy switch for this inside the rear of the cockpit) and test out all the controls to see what they showed on the test mode.

The brake pedal gave no response.

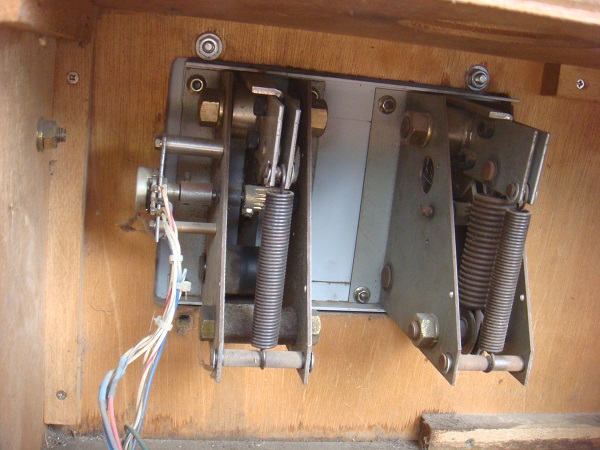
Strange I thought – the car slows down when I shift my foot onto the brake and slows down when pressed. I stuck my head into the back of the cockpit once more to have a look at the rear of the pedal assembly, specifically the brake. It would appear the pot that connects to the brake pedal is no longer attached and had not been attached for some time. What I thought had been the brake slowing the car down was nothing more than me taking my foot off the accelerator (which explains the unresponsive feel of the slow down).

As you can see in the image below, the pot is not attached to the brake pedal.

Pedal Assembly Start
Continue Reading

One of the first issues I noted with the pole position machine was the condition of the screen acrylic and it’s lack of proper artwork. I wanted to address this as a priority, but it has taken a little bit of time to get around to it. This was the state of it when I first picked it up:

Screen artwork start
Continue Reading

When I first opened the back of the machine, this is the sight I was greeted with:

Blocked

A number of things bothered me:
1) The bottom left corner of the game board was physically resting on top of the switcher. This has actually left some marks across the top of the switcher and some discolouration on the side of the pcb.
2) The middle of the PCB is physically resting on top of the fuse switch. Not a big deal but I don’t like the fact the PCB is actually resting on components of the machine.
3) The pcb isn’t sitting properly due to a makeshift foot (see the top right pcb foot), which leaves it on an angle.
4) Loose power cable hanging across the PCB
5) The frame holding the PCB in place is attached to the base of the monitor panel. While the pcb itself doesn’t have much weight (and any it does have is currently resting on the switcher) I want to reposition it so it’s away from the monitor and not in the way of everything. There is no way to access the speakers, coin mech or steering wheel with this set up.
Continue Reading