Archives

All posts for the month February, 2011

I decided to look at sourcing the wood for the cab today. There were two places I considered – Bunnings and Melboards (located in Hallam – so close to me). Bunnings won out. I estimate I will need 3 boards of 1800 x 1000 x 18mm. Bunnings has 2400 x 1200 x 18mm for $33 each. This should leave plenty of left overs for things like the base, top and front panels. I suspect I will need some additional wood for bracing and load bearing, but that will be purchased separately, and cost much less.

Thickness was a decision I made based on some advice and general research. Anything below 16mm will be too thin, especially for an upright. You could maybe get away with 12mm for a counter top, or a very cheap table top. The real choice is between 16, 18 and 21mm. The good thing about 18 and 21mm is T moulding is easily obtained for these thicknesses. If you go with 16, you will need to do additional trimming, or try and source smaller T moulding. I felt 21mm would be too thick for my cab, so 18mm it is. I guess generally speaking, the bigger the cab, the thicker you should go to ensure it’s sturdy.

A month has flow by now, but I’m pretty happy with how things have progressed. I would have loved to see more happen with the actual cab shell, but that’s should start to move forward over the coming fortnight.

So in the first month, I’ve been purchasing lots of bits and pieces for the cab itself. I now have the JAMMA board, a power supply, a 21″ monitor, JAMMA harness, buttons, joystick, components for a service/test switch, a coin mech, a coin counter (waiting delivery) and some other small bits and pieces for building and mounting.

This month, I’m expecting to get the basic shell for the cab put together and hopefully have the PCB, power supply and monitor all mounted inside.

Another Galaga cab project link to share (link). There is some great reference material around. Although I find some important bits missing in most. So I hope I can cover the missing bits with the blog to help those who come after me with understanding more about what’s involved with getting the internals hooked up and going.

As I draw closer to cutting up some wood to begin the actual cab itself, I have been reconsidering a few of the original decisions I had made regarding the cab shape, size and placement of the internals. One of the original inspirations I had was a cab by Homepin. It’s a lowboy multiboard, and I loved the internal design. Here is a link. (Note: For those of you looking for good write up on building a cab, this link should prove useful! There is a good parts list and price break down, clear photos of the build process and some cool ideas for the internals).

What I loved most about this cab was how everything was built into the door. Open the front door and everything is right there. Great for construction and maintenance. My original goal was to do a similar thing, but with the Centipede cabinet. But lately I have been leaning more towards a Galaga cabinet. The reason being is I grew up playing Galaga. It’s one of the driving forces behind building this cab. I think I would love and appreciate the final result more if the cab closer resembled an actual Galaga cab.

A link I came across a few days back was a Galaga cab restoration. I was very impressed by how clean the internals were and the final result of the cab. I remember saying “I’d love to sit down and play on that!”. And that’s what I want with my cab. So it’s got me rethinking a few things 🙂

So this changes a few things – but mostly, I cannot have a front door with everything right there. It will have to be a rear door, like the actual Galaga cab. I still plan on having a secondary game button, and MIGHT try and find room for a trackball on the control panel so I can play the trackball games on the multiboard (if a choose). The coin door on the front I think will be modified for my cab. It will exist, although in a cut down version. I would like to hook up the test/services switches just inside this door for easy access (instead of having to go via the back). But otherwise it should remain about the same.

The multi board is quite small, so will required much less space than the original Galaga PCB. What I am thinking is attaching everything to a removable board at the base, and allow for a vertical board on the side, should I choose to install an original PCB in the future. The front panel will contain the coin mech, coin counter and test switches.

I still have about 2 weeks before I get the wood and being cutting, so there is still time to clear my thoughts. But the more I think about the final result, the more I lean towards a Galaga Cab…

Deciding on what to do with the screen took some time. There were basically 4 clear options i could choose from.

1) LCD PC Monitor. The Multiboard has a standard 15 pin monitor connection on the board, so hooking up an LCD screen would be no problem. The pros here are they are easy to get, not too expensive, thin and light. The downside here is the cab would lose some authenticity. I would expect to pay around $120 – $160 depending on size and brand.

2) VGA PC Monitor (CRT). As mentioned for the LCD, I could use the 15 pin monitor cable. The positives here are its more authentic, even cheaper and pretty easy to come by (thanks to eBay and hard rubbish collections). Image quality will be fine although not the best

3) CRT Arcade monitor. The most expensive option, but one that would delivery the best, most authentic results. But yes, expensive. In the range of $500+ entry level.

4) TV + Chassis. Image quality here would beat the entry level arcade monitors, and the chassis would set me back around $250. A bloke on the aussie arcade forums does them up and provides all support required. I would need to do some wiring here, so there is more work involved. On the up side I have a 68cm TV sitting around doing nothing I could use.

Ordered by price (approx):
1) CRT ($10)
2) LCD ($130)
3) TV + Chassis ($250)
4) Arcade CRT ($300+)

Ordered by quality:
1) Arcade CRT
2) TV + Chassis
3) CRT
4) LCD

I decided to do some hunting around on ebay to see what sort of price I could snag a 19″ or 21″ CRT monitor. Given their size, it would be pick up only, and have to be close by. I managed to come by one – a 21″ for just 99 cents. So I grabbed it. My real decision in the end was between the TV + Chassis and CRT. CRT won out in the end because of the price difference. For what I want, with the old school games on the JAMMA board – the CRT should be fine image quality wise. And for under a $1 – hard to beat price wise 🙂

Not the best picture – but a quick snap after bringing it home. I will remove the stand before using it as I doubt I will need it.

Monitor

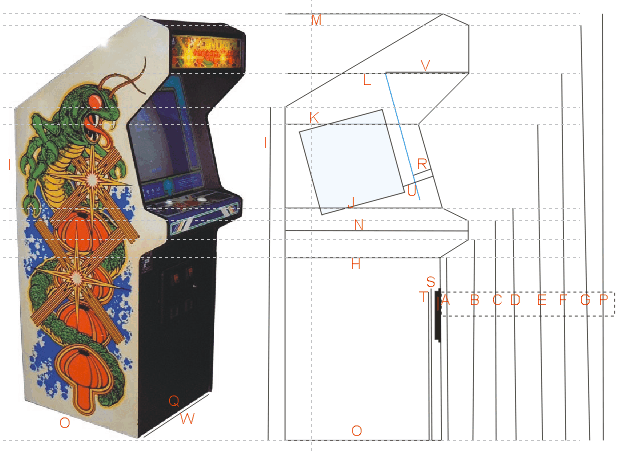
I came across some more detailed plans for the Centipede cab I want to build. Not sure what lead me here as I wasn’t searching for plans, but I found this very interesting, and it should help me when it comes time to build.

pos. cm inch pos. cm inch
A 85,09 33.5 M 67,31 26.5
B 92,075 36.25 N 81,28 32
C 100,965 39.75 O 68,58 27
D 104,775 41.25 P 180,975 71.25
E 137,795 54.25 Q 64,135 25.25
F 158,75 62.5 R 7,62 3
G 175,895 69.25 S 76,2 30
H 68,58 27 T 73,66 29
I 142,24 56 U 13,97 5.5
J 70,485 27.75 V 31,75 12.5
K 61,595 24.25 W 60,325 23.75
L 80,01 31.5
Marquee glass 60,5cm (60,325cm?) x 16,5cm  (23,75″ x 6,5″)

There was more useful information on other cab plans, and control panel building which can be found here.