Archives

All posts for the month September, 2013

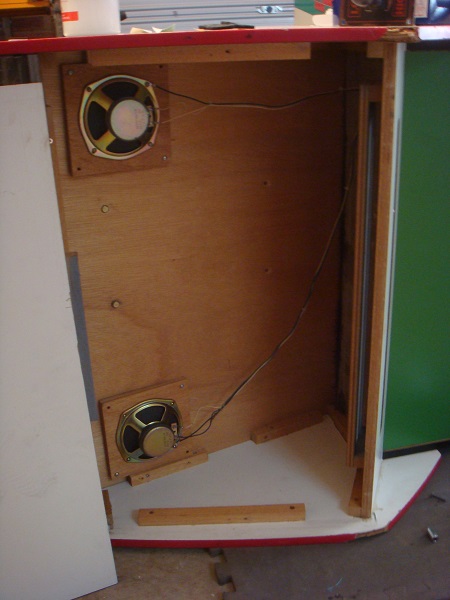
When I first opened the back of the machine, this is the sight I was greeted with:

Blocked

A number of things bothered me:
1) The bottom left corner of the game board was physically resting on top of the switcher. This has actually left some marks across the top of the switcher and some discolouration on the side of the pcb.
2) The middle of the PCB is physically resting on top of the fuse switch. Not a big deal but I don’t like the fact the PCB is actually resting on components of the machine.
3) The pcb isn’t sitting properly due to a makeshift foot (see the top right pcb foot), which leaves it on an angle.
4) Loose power cable hanging across the PCB
5) The frame holding the PCB in place is attached to the base of the monitor panel. While the pcb itself doesn’t have much weight (and any it does have is currently resting on the switcher) I want to reposition it so it’s away from the monitor and not in the way of everything. There is no way to access the speakers, coin mech or steering wheel with this set up.
Continue Reading

Locating information specific to the Namco Pole Position 2 pin outs proved to be a challenge. The Atari pin outs are easy enough to find and are documented on a number of sites (although a number of sites reference the same documentation). The Atari PCB uses a 30 pin connector on the video board and a 44 pin connector on the CPU board. The Namco board set however uses a 20 pin connector on its video board and a 36 pin connector on the CPU board.

After much Googling, I came across a YouTube video showing the exact Namco PCB I owned. Interested, I took a look and read the comments. Tucked away in the comments was a link to a Japanese website that supposedly contained the pin outs for the Nambo Pole Position board set. Returning to Google with the web address, I was able to view a translated version. I was happy to see that this was the actual pin out for the Namco board set!

I’ve reproduced the pin out diagram here:

– CPU Board (J4): 36 Pin

Component side Solder Side
+12V OUT A 1 +12V OUT
LOCK OUT B 2 START LAMP
COIN COUNTER 1 C 3 COIN COUNTER 2
SERVICE D 4 TEST
COIN 1 E 5 COIN 2
START 1 F 6 START 2
N/A H 7 SHIFTER
GND J 8 GND
SOUND 1 K 9 SOUND 2
SOUND 3 L 10 SOUND 4
SOUND GND M 11 SOUND GND
VOL GND N 12 VOL GND
GAS P 13 BRAKE
VOL VCC R 14 VOL VCC
+5V OUT S 15 +5V OUT
N/A T 16 N/A
STEERING 1 U 17 STEERING 2
GND V 18 GND

* connect the “START 1” and “START 0”

– Video Board (J1): 20 Pin

Component side Solder Side
SP FRONT R+ A 1 SP FRONT R-
SP FRONT L+ B 2 SP FRONT L-
SP REAR R+ C 3 SP REAR R-
SP REAR L+ D 4 SP REAR L-
VIDEO RED E 5 VIDEO GREEN
VIDEO BLUE F 6 VIDEO SYNC
VIDEO GND H 7 VIDEO GND
GND J 8 SOUND 1
SOUND 2 K 9 SOUND 3
SOUND 4 L 10 SOUND GND

Continue Reading

One of the first things I decided to tackle was giving the shifter a service. The shifter is a basic high / low – 2 position shifter. It works (at least 95% of the time), but could certainly do with a clean and re lubricating. There are a few cases where it doesn’t shift into high gear correctly, but I suspect this will be corrected with the service. To make sure, I’ll replace any mircoswitches too.

The first thing to do was split the cockpit into two parts. The base is held together with two metal plates (one on either side) and 4 bolts. The tread on the bolts has just about worn thin from age, so using an Allen key will be required. For those that are interested, you can use an 8mm or 5/16″. The plates are in decent condition, but do require a bit of a clean. I will make some time to do that before putting it back together.

cockpit plates
Continue Reading

One of the first things I tested when bringing the cockpit home was the coin mech. All my machines accept coins. There is something satisfying about having your coins lined up on the machine ready to go, and then placing the coin in – hearing that click – and beginning your game. It’s part of the experience and therefor is something I want all my machines to have. It’s not a proper arcade machine without a functioning coin mech 🙂

I have all my games set to accept 20c coins. Although in this case, it isn’t going to accept 20c coins:

coin mech
Continue Reading

One of the small things on my to do list was to repaint the rear speak grills. They were looking worn and faded and with some small attention could be made to look as good as new again. Since I had the rear of the machine on it’s side (working on the shifter), I figured I could do this at the same time.

I removed the bracket holding the rear acrylic in placed, and then the two screws holding the back panel to the machine. There were cobwebs and dust everywhere, so a quick once over with the vacuum tidied it up nicely.


Continue Reading