Fireball Classic – Bally (1985)

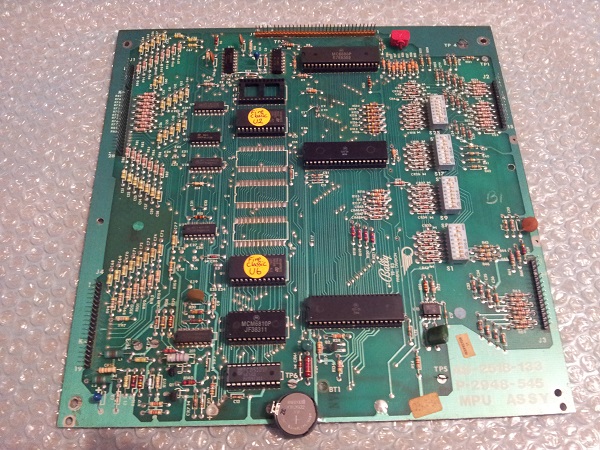
It’s time to finish off my Fireball Classic restoration. When I started my Xmas / New Year holidays, I had the goal of finishing this off before I went back to work. Looks like I’ll get there with a day to spare. With the presentation of the machine completed in my last update, I wanted to address the last few operational issues with the machine. The first thing to look at is the MPU board. As mentioned a few times in earlier updates, the MPU board has suffered from corrosion. A battery left in way too long managed to spread damage all around the outer edges on three sides of the board and it had begun to work its way in at the components. Damage was also done to the J4 pins and even the female connector pins on this plug.

I was able to obtain a second hand original Bally MPU board in excellent condition with no corrosion damage at all. The male pins at J1, J2, J3 and J4 were all replaced, along with new 5101 RAM and a lithium battery to ensure there is no risk of battery damage in the future. This one came from a Baby Pacman machine I’m told. New game ROMs were also burned and installed.

Fireball Classic Pinball
Continue Reading

The end is in sight for the installation of my new Fireball Decals. The headbox was completed a few weeks ago. The right side was completed last week and now this week, it’s time to knock the left side over. This includes a new side rail to finish the cabinet off nicely. The left side decal was in a similar condition to the right with the colours badly faded. The condition of the cabinet was better though and less damage to patch up.

Fireball Pinball
Continue Reading

Here I was thinking I would not get to look at finishing the Fireball Classic decals until the new year. Railways pulled off an amazing Christmas Miracle and managed to get a new custom set of side rails delivered just before Xmas day. No reason to delay, I wanted to get the side art completed ASAP. This update will cover the right side and the final update (part 4) will cover the progress on the left side. The new side rails fit perfectly and the button could now sit correctly.

Fireball Pinball
Continue Reading

With the headbox decals complete, it was time to move onto the cabinet body decals. This was supposed to be a 2 part update (first for the headbox and the second for the cabinet). Sadly, I’ve run into a problem which is going to set me back about 4 weeks. Even with all my planning, I can’t predict everything. But that’s OK, I’ll go as far as I can and just do a short update for now.

The side art on the cabinet is faded, just like the headbox. The rails are also damaged – the worst being the right side rail (as you can see about 1/3 of the way up the rail).

Fireball
Continue Reading

It’s been a long time since I did any work on my Fireball Classic. I worked with a friend and had the artwork recreated over 6 months ago. It was only recently delivered in physical form. Finally. But it looks good. Really good. With my Xmas holidays about to start shortly, I figured it was time to once again give some attention to my Fireball Classic restore project and complete it. The main thing left is the side art, although there are a few other ends I want to tidy up also before I’m happy to say “I’m done”. In this update, i’ll be adding new side art to the head box. As you would have seen in previous updates, I had the side art reproduced (since it’s not actually available anywhere). A lot of attention was given to the detail of the curves and the stars, so it’s pretty accurate. The side art on my machine is very much faded and is also torn in several places. The t-moulding is also cracked and will need to be replaced.

Fireball
Continue Reading