stencils

All posts tagged stencils

It’s time to finally post another update on my Pinbot restoration. Over 2 months since my last post, and it feels like much longer. I was well underway with the cabinet restore when I encountered an issue with the stencil kit purchased from Twisted Pins. I did a detailed write up of the experience – which you can read about here: http://www.enteryourinitials.com/2015/05/07/twisted-pins-customer-service-is-horrible/. As a brief summary – avoid buying from them if you can – Travis is not worth dealing with and the stencils are not good quality. Look to Pinball Pimp and Flipper Rescue for their stencils first as the quality is much higher and the guys running those businesses are much better to deal with (especially if there is an issue). I had originally planned to make the cabinet restore a single post. But due to the issues encountered and the time it’s taking, I’ve decided to cover the cabinet restoration across a couple of posts. So time to dive in and chart the progress so far.

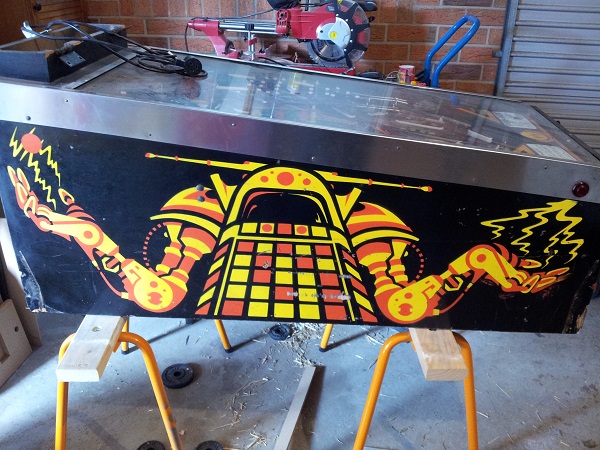
The starting point. The left side of the cabinet is the hardest hit in terms of damage. There are a few nice chunks taken out and plenty of scratches and scrapes of varying degrees. For many people, this state is more than reasonable. If it was another machine, I’d probably leave it. But this is Pinbot and a machine I love – so I’m keen to go the extra yards and make it beautiful again. The cabinet is still very solid, which is an excellent starting point. After some patching and repainting, it’s going to look awesome (I hope).

Pinbot Cabinet Restoration
Continue Reading

Update – Decided to sticky this and also add direct links to threads on Aussie Arcade and Pinside highlighting the negative dealings people have had with Twisted Pins and Travis.

Thread on Aussie Arcade forums – Link

Thread on Pinside forums (Appended to an existing thread)- Link

Originally posted May 7th, 2015.

After a very poor experience with Twisted Pins over the last month, I’ve decided to write up the details for others as a warning. If you must order from them, be aware they don’t have the strongest reputation (as I’ve since heard and now experienced). In fact after some searching, I’ve found a number of people have a very negative view of Twisted Pins and the guy who runs it – Travis Brawley. No doubt people order from them without issue. But if there is an issue with your stencils (as I found with mine), you may not get any support – regardless of where the fault lay.
Continue Reading

This update took much longer than I expected it would, but finally the headbox has been patched and repainted. Outside of some cosmetic damage, the headbox is in good condition. While the artwork was faded in parts and there was some minor damage to the wood, it was at least strong and stable. Unlike the Fireball Classic I recently restored, the Pinbot cabinet artwork is painted on with the use of stencils. A full set are available at TwistedPins and Santa managed to deliver a set to me during the Xmas period and it was time to put them to use.

I’m going to break the process up into two parts. Firstly i’ll do the headbox, which will then be followed by the cabinet. To begin with, I removed the stencils from the packaging and flattened them out. There are two stencils per side – one for the red/orange colour and the second for the yellow. It also comes with a set of instructions which are not complicated – just common sense really.

Pinbot pinball
Continue Reading

The Fireball Classic has some pretty neat side art. The one down side to it is it fades. Every Fireball machine I’ve see has suffered the same fate (to varying degrees). On mine, the yellow fire is white and the orange fire is yellow. The red and blue have held up better, but have certainly seen better days. The side art is actually printed on decals, which is the primary reason for the colour fade.

There are two options available to me – replace the decals or use stencils and paint. I explored the painting option first but backed away from that option. There are stencils available for the original Fireball machine, but none for the Classic. I could make my own, but it would be quite time consuming to get it right and I don’t believe it would provide an accurate high quality finish like the original.

That left decals. I did some searching but could not locate any for sale. Luckily I had a contact who is an artist and was up for reproducing the fireball decals. With his help, the head box and cabinet body decals have been reproduced. We went through a few revisions as some issues were ironed out, but it’s come up looking pretty good.

Fireball classic side art decals
Continue Reading