assemblies

All posts tagged assemblies

After being burnt out from pinball repair write ups and taking a bit of a break, I’m back with a new machine to cover. Corvette was released by Bally back in 1994 and had just over 5000 units made. The playfield is loaded with fun things that include 3 flippers, 3 ramps, a ball diverter, ball save kick back, a drag strip, pop bumpers, spinner, engine (that vibrates in play and interacts with the flipper buttons). Mix in good shots along with fun modes that include some great sounds and you’ve got yourself a fun game to play. I’m not a car person and have no interest in Corvette as a brand, but this is a fun game to play!

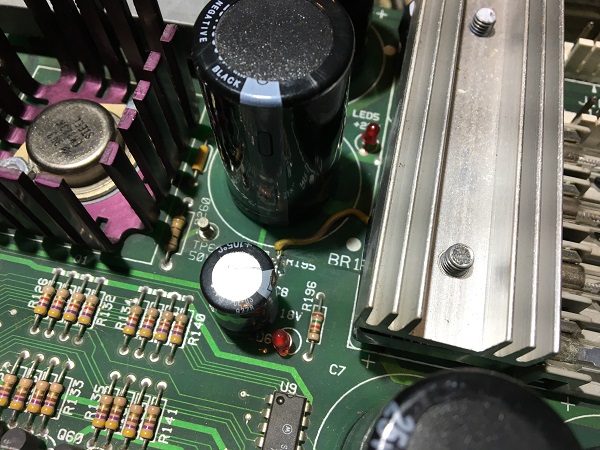
When the game first arrived for its rebuild, it wouldn’t boot and instead displayed the somewhat common “Check Fuses F114 and F115” error message. The owner told me the game had been booting, but then stopped one day after he moved it. Every other time I’ve hit this same error message, the fuses have been fine. This time was no exception as both fuses were removed, tested and found to be good. The game was switched back on and I observed the series of LED’s on the board indicating the presence of power along this part of the circuit. There is a lot of information out there for this error and a nice diagram of the circuit here:
http://www.pinwiki.com/wiki/index.php?title=Williams_WPC#Check_fuses_F114_and_F115_message

The board isn’t getting its 12V. There’s not a lot to it. Following this back along the board, I quickly spotted a repair that had been done sometime in the past.

Corvette Pinball Repair
Continue Reading

The newest game to arrive in my line up (and next on my to do list) is a Star Trek: 25th Anniversary. The game was released by Data East in late 1991, with 4400 machines made. Being one of the early DMD games, it features the smaller 128×16 pixel DMD. I love the artwork on this game as it contains so many references to the 3 seasons of the original Star Trek series. It’s a shame that some of it is covered by various playfield parts. The game arrived working well, with just a few small things needing to be looked at. It needs a good clean and a rebuild though, which is what I’ll be focusing on.

Star Trek 25th Anniversary
Continue Reading

Who likes self punishment? I do, it seems. My BoP 2.0 machine came with a touched up and clear coated playfield when I purchased it 14 months ago and it’s a task I knew I would get to at some point. But when you’re having fun playing a game, it’s hard to take it offline for some major changes. Playfield swaps are a time consuming process, so it’s not something I’ve been looking forward to. I gained some excellent experience when I did my Pinbot CPR playfield a couple of years ago and I’ll be rolling that knowledge in to how I approach this one. The up side here is the replacement playfield is an existing playfield, so all screw holes (both sides) are already there. New playfields have (most) screw holes dimpled, but can be up to 1mm out in any direction (according to CPR – not sure if that also applies to other playfield makers). On my Pinbot playfield, I found many dimples missing on the underside. This can be a pain for assemblies under the playfield that are made up of 2 or 3 components, consisting of up to 12 screws, which all need to line up in order for it to operate smoothly. The current playfield in my game isn’t bad by any stretch as mylar across the central playfield and pop bumper areas has protected most of it. I actually think it would make a great drop in replacement for someone who has a trashed playfield or someone who wants to touch up and clear coat one for themselves. Time to begin the process.

Bride of Pinbot 2.0 Playfield Swap

Continue Reading

Batman Forever has been cleaning up really nicely. The game is in excellent condition, which makes my task easier. In this update, i’m now going to work through the last of the playfield assemblies so I can begin getting everything back together for a proper test. That means for this progress report, I’ll be covering the top playfield section. This includes the VUK, ramp diverter and three pop bumper assemblies. I already covered the orbit rail, saucer assembly and upper left and right playfield / plastics in a previous update, so won’t need to worry about those now. There’s a large ramp and rail that will need to be removed first, but from there it should be smooth sailing.

Batman Forever Pinball Repair
Continue Reading

It’s time for the third installment on the Batman Forever rebuild. I’ve been a little slower than I’d like getting this update posted, but it’s been a busy time of year (and getting busier as we race towards Christmas). Having worked through the lower playfield areas in previous updates, I’m now going to focus on the middle playfield sections. This area is home to an upper flipper, some stand up targets and also a 4 bank of drop targets. There is an orbit shot which I want to remove the parts from and clean too as the rails are attached under some of the middle playfield plastics – so it’s easier to deal with that now than have to remove plastics again to remove the orbit rails at a later time. To start with though, I’ll need to remove various rails and ramps to get access to the playfield parts below. I’ll start with the right side.

Batman Forever Pinball Repair
Continue Reading