Wiring

All posts tagged Wiring

Before I stripped and cleaned the playfield on my last action hero, I had a phantom ball drain occur a few of times. When I say phantom drain I mean the flippers go dead, end of ball music plays, you are awarded a bonus and then the next ball is served up. I suspected at the time it could be a trough switch needing adjustment and since I was going to look at the ball trough as part of the playfield cleaning, I didn’t bother looking closer at it. Fast forward to post cleaning. I had the playfield back together and began to test. After a couple of games I noticed that the phantom ball drain was now far more common – in almost every game it would occur. I also began to notice other side effects where some playfield features would be activated without hitting the corresponding switch.

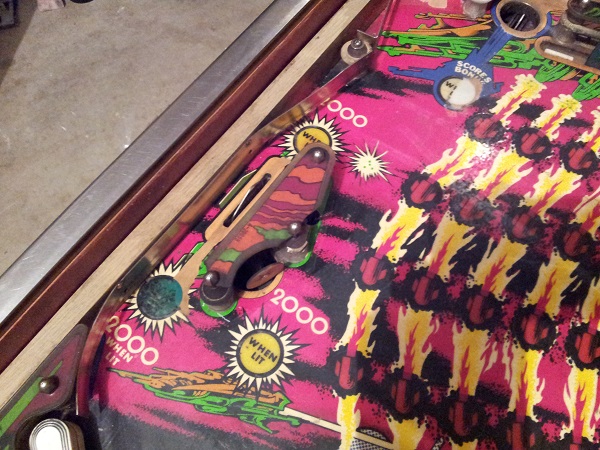
After some additional testing during a game, I found a direct relation between the phantom drain and the “R” drop target. When this target was hit, it would instantly believe the ball had drained, award a bonus and continue to the next ball.

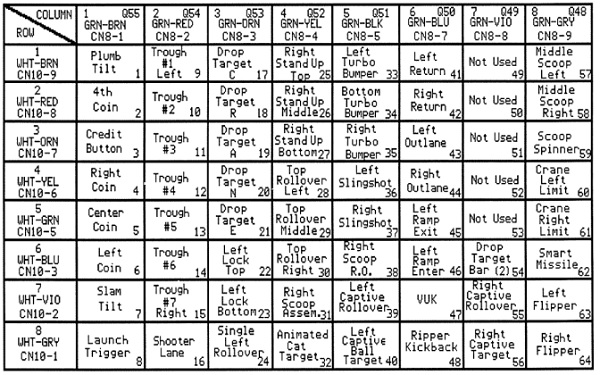
Now that I had a suspect switch, I went into switch test mode and explored the switches to see what I could find. This is the switch matrix from the LAH manual:

Last Action Hero Pinball
Continue Reading

During my initial inspection of the machine in the first update, I had noted down a few things to look at before I attempted powering it on for the first time. This update will focus on these items. First on my list is the fuse panel. Located just inside the coin door, there is a small panel which is home to 4 fuses. My understanding is that the fuse clips on Bally EM’s are crap and a common source of problems as they often break. One of the fuse holders has already been replaced, with the new fuse holder being installed over the old one. The fuse holder on the far right (8A line fuse) is missing one of the clip arms, so this will have to be replaced.

Mariner Pinball
Continue Reading

The Counterforce to do list is beginning to thin out and I’m looking forward to (hopefully) having it knocked over in the next few weeks. Although as it turns out, in this update, I do a few extra things I had originally decided not to – but it’s worth the time. First on the hit list for this update is the pop bumpers. They need a proper service. I think they are many, many years over due for one. There are two pop bumpers located on the playfield and at first glance, they have been well worn over the years. The caps have some sticky crap attached to the top of them. The decoration is wearing and there is some serious playfield wear below the (once clear) platters.

Counterforce Pinball
Continue Reading

The progress is going really well right now on Counterforce and these updates are coming faster than I had expected. My plan was to focus on one set of the flippers for this update, but that got pushed back so I could complete a few other things off first. In recent updates I’ve had my attention at a few sections around the playfield with sling shots and targets. This update will focus on the remaining targets and also the bonus saucer. Next update will be the flippers 🙂 The first part of the update will look at the small target and switch located above the left (upper) flipper. The plastic here is broken in two points.

Counterforce Pinball
Continue Reading

It’s time to finally post another update on my Pinbot restoration. Over 2 months since my last post, and it feels like much longer. I was well underway with the cabinet restore when I encountered an issue with the stencil kit purchased from Twisted Pins. I did a detailed write up of the experience – which you can read about here: http://www.enteryourinitials.com/2015/05/07/twisted-pins-customer-service-is-horrible/. As a brief summary – avoid buying from them if you can – Travis is not worth dealing with and the stencils are not good quality. Look to Pinball Pimp and Flipper Rescue for their stencils first as the quality is much higher and the guys running those businesses are much better to deal with (especially if there is an issue). I had originally planned to make the cabinet restore a single post. But due to the issues encountered and the time it’s taking, I’ve decided to cover the cabinet restoration across a couple of posts. So time to dive in and chart the progress so far.

The starting point. The left side of the cabinet is the hardest hit in terms of damage. There are a few nice chunks taken out and plenty of scratches and scrapes of varying degrees. For many people, this state is more than reasonable. If it was another machine, I’d probably leave it. But this is Pinbot and a machine I love – so I’m keen to go the extra yards and make it beautiful again. The cabinet is still very solid, which is an excellent starting point. After some patching and repainting, it’s going to look awesome (I hope).

Pinbot Cabinet Restoration
Continue Reading