
Something that has been on my to do list for the last 8 months is take a backup (drive mirror) of the hard drive in my Bride of Pinbot 2.0 machine. At the very heart of the 2.0 upgrade kit is a mini PC running Windows on a solid state drive (SSD). Solid state drives are very reliable, but like any computer – it’s at risk of failure over time. If your BoP 2.0 hard drive becomes corrupt or the drive dies – there’s no install CD to run and get it up again. The mini PC hardware can be replaced – but what’s on that drive can’t. Small SSD’s are cheap now (the one I purchased for this backup here was $35AU) and because it is just a Windows computer, you can mirror the drive with a full backup should some disaster occur. I thought I would put together this post for any other BoP 2.0 owners wanting to mirror their drive so it’s easy to restore if a new HDD / computer is needed. There’s a good video tutorial for backing up your BoP 2.0 on YouTube (https://www.youtube.com/watch?v=pOLaBT30dpM&t=849s), which uses a different method to what I cover here. Both methods work though, so go with what you’re more comfortable with 🙂
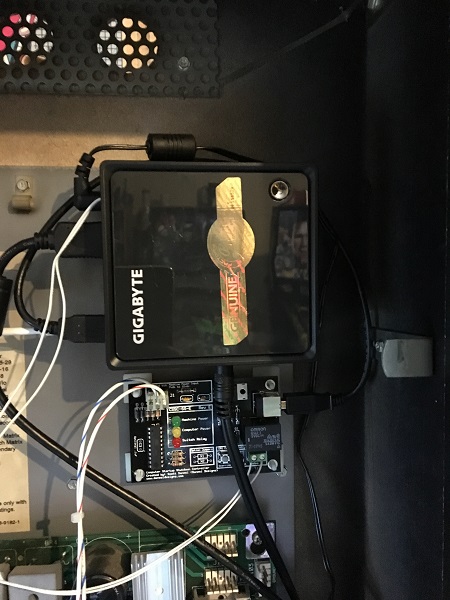
To do the drive mirror, I need to get the hard drive out of the machine. The Mini PC is mounted to the rear of the headbox. To remove it from the mount, simply slide the computer up. To get access to the hard drive, you need to undo 4 screws at the base of the mini PC.
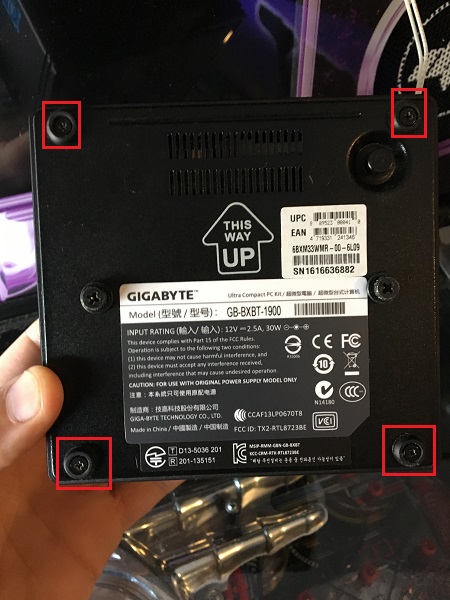
The base then pulls away, with the hard drive attached. I’ve blacked out the account and BoP 2.0 serial numbers which are printed on a label attached to the hard drive. These will be different for each BoP 2.0 kit. I’ll include a small note at the end of the post about the serial number which is important if you were using a backup from someone else. Be careful when removing the base as the hard drive has a cable running to the main board, which will need to be disconnected. You don’t want to be too rough and damage the wiring when pulling the base away.
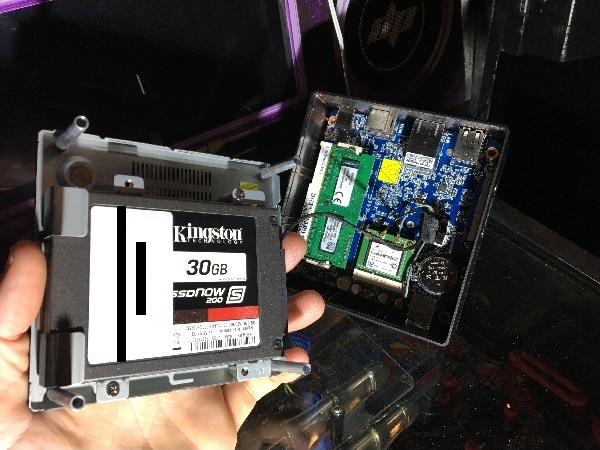
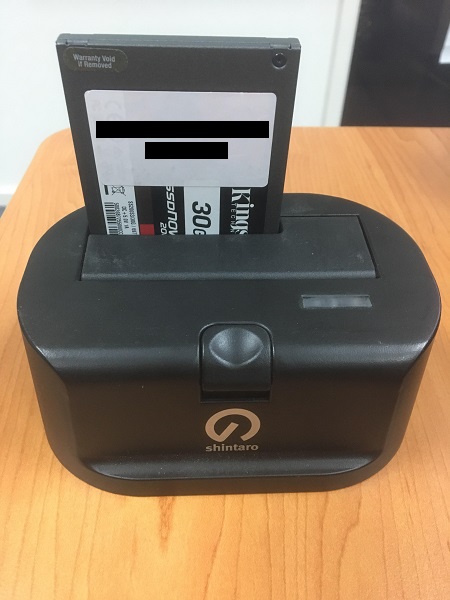
The hard drive is installed on to the base panel of the computer via a caddy. Undoing a few screws will have it out in seconds. Now I can go about taking a mirror of the drive for a backup. The first step is to get the hard drive mounted on my PC. I use an external hard drive dock that the hard drive plugs in to and connects to the computer via a USB cable. This then allows the computer to see it as if connected up internally. Again, I’ve blacked out the BoP serial number.
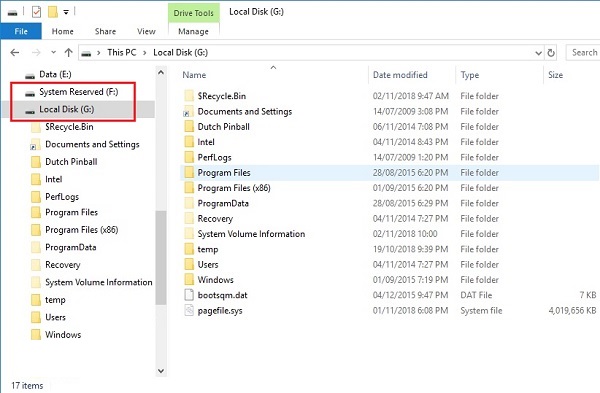
After a few moments, Windows will recognise the drive and allow you to view it via Windows Explorer. The Bop 2.0 setup runs on a cut down (+ slightly modified) version of Windows 7 Home Basic and is installed on a small 30 GB SSD drive. There are actually two partitions on the drive mapped to F: and G: (System Reserved and Local Disk). Both of these need to be included in the backup. The smaller partition (System Reserved) contains boot information, while the larger partition has Windows, applications and Dutch Pinball software.
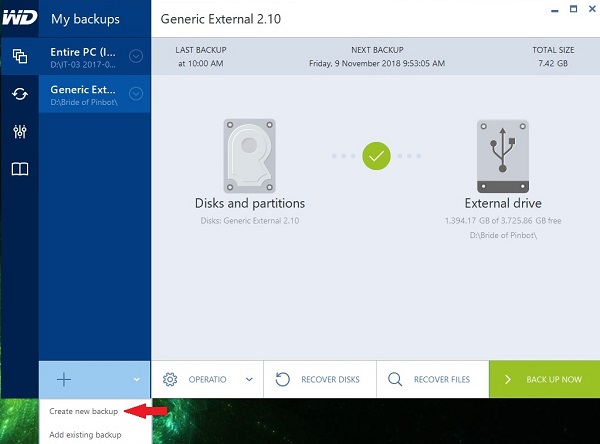
To perform the backup, I’ll be using a software package called Acronis True Image. This will take a complete copy of the drive, which I can then restore to a new brand new drive and simply plug it in to my BoP computer. That way I don’t have to worry about any installing or configuring. To begin the process, I started up the Acronis software and selected “Create New Backup”.
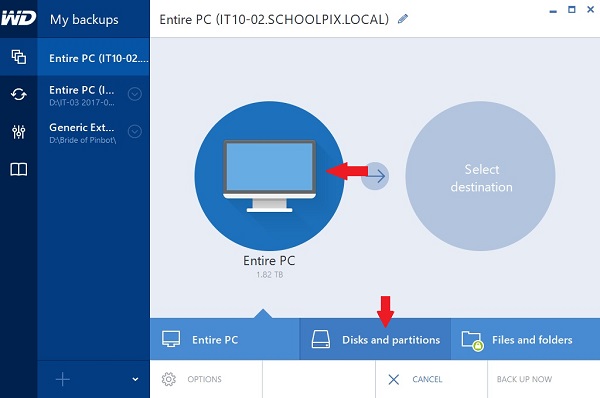
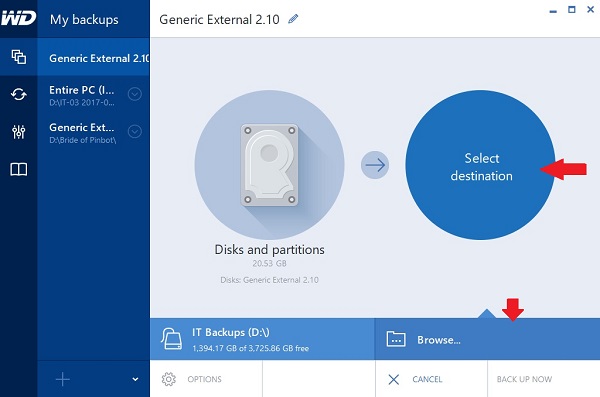
I don’t want to backup the entire PC, only the BoP drive. So I click “Disks and Partitions” so I can specify just the drives I want.
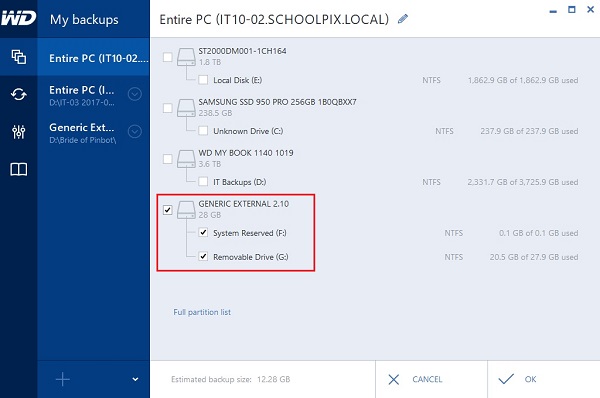
Here I select the F: and G: drives from the BoP hard drive and press OK.
Now I need to set the target for the drive image to be backed up to. Press “Browse” and create a folder on another hard drive – I called mine “Bride of Pinbot”. The drive your backing up to will need about 15 GB of spare space for the image to be written to. It depends though on how much space you have used on your BoP 2.0 drive. For example, the more firmware versions you have installed, the more space it will required. You can actually delete out old firmware versions (if desired) via Windows explorer before running the backup as they are no longer needed.
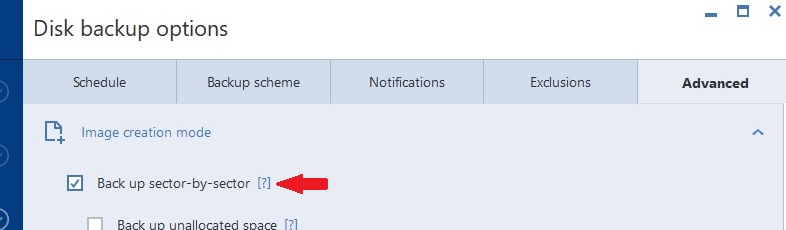
Before starting the backup though, we need to change one of the advanced settings. Click “options” and then the advanced tab. Make sure “Back up sector-by-sector” is ticked. Failing to tick this will not get the desired results (which i’ll show further down the tutorial below).
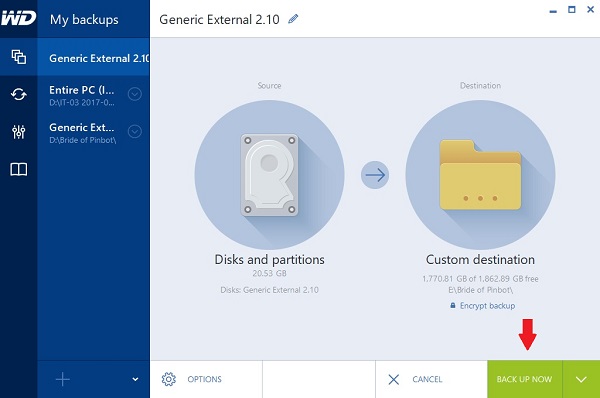
With the source and target now set, along with the advance options, press “Backup Now” to begin.
Acronis will start the backup process. This took around 15 minutes to do. The BoP drive is only 30 GB in size and roughly two thirds of that is used. Each firmware update is around 800 MB in size, so depending on how many firmware versions you have installed, the size of the data to copy will vary. On mine I have 3 versions (1.13, 1.16 & 1.19). I should probably delete out 1.13 and 1.16.

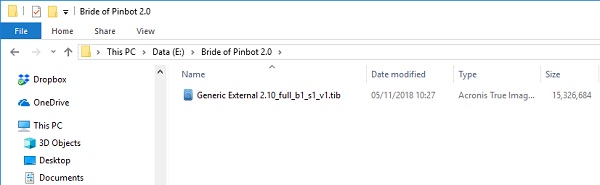
Once the backup process is complete in Acronis, I can confirm the backup file was created by using Windows Explorer to browse to the backup folder. There I could see the .tib file created by Acronis.
It’s no good having a backup and not knowing if it works or not. So my next step is to restore that backup .tib file to a new hard drive and install it back in the game. I purchased a 120 GB SSD from a local PC store for $35AU. BoP 2.0 only uses a 30 GB drive, but the 120 GB was the smallest drive they had. So i’ll be left with plenty of empty space.
The source BoP drive was unmounted and removed from the dock. The new drive was then installed into the dock. At this point I had to use Windows Disk Manager to initialise the new drive. Windows wouldn’t recognise the new drive until I did so. I did a quick format on it and the new drive was ready to use. You don’t need to worry about setting up partitions, the restore will wipe the drive anyway and create the two partitions. There are a few ways to open up the Disk Management application, one is to press Windows Key + R (Run) and then enter diskmgmt.msc and press enter.

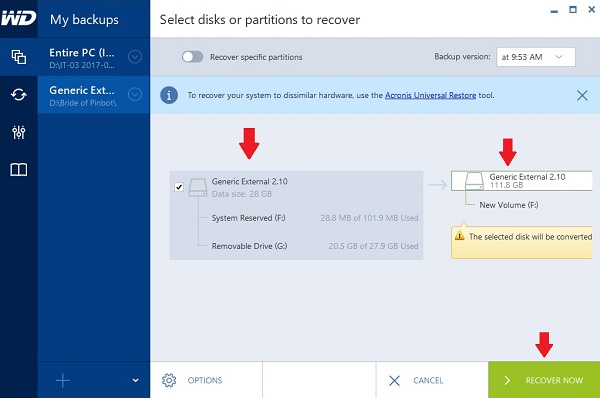
Back to Acronis, I select restore on the BoP backup and the drive I want to restore to. Before starting the restore though, we want to again go into options, select the advanced tab and make sure “Restore sector-by-sector” is ticked, since our backup was created using this method. Now press “Recover Now”.
The restore process then applies the backup to the new drive. Once complete, I used Windows Explorer to view the contents of the new drive. There I could see Windows and the Dutch Pinball files. So it looks like the restore has worked.

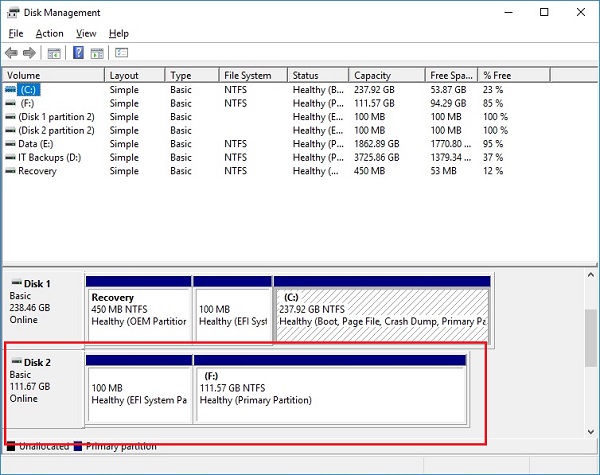
There are two partitions that need to be restored though, and it’s important to make sure they were restored correctly. Going back to the Disk Management tool, I can see that there are two patitions and the System Reserved partition is there. It’s also important to make sure that Reserved partition has the “Active” flag set on it. During my attempts to mirror the drive, I had a few failed results, where two partitions were restored, but not correctly configured. In this case, the Reserved partition was there but did not look correct. Instead of saying “System Reserved” it has “EFI System Partition”. This is due to Acronis changing the partition type on the new drive to GPT – when it needs to be MBR (as per the original hard drive).
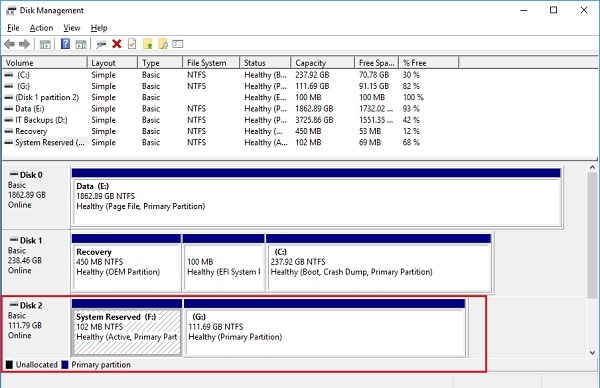
When restored correctly, both partitions should be visible. I found updating to Acronis 2019 fixed this and the restore process retains the partition type as MBR. It’s vital as the small system partition contains boot information and without it, the game will not boot into Windows. Now the partitions look correct.
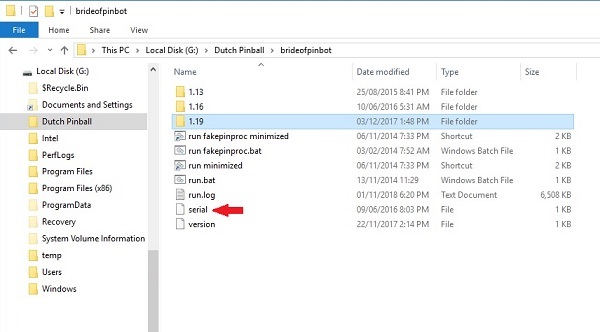
If you’re restoring a backup from someone else’s BoP 2.0 game, you will need to set up your serial key. The only time you would be doing this is if you didn’t make your own backup and were relying on someone else to give you a backup that you can restore from. I believe this is used for connection with the BoP 2.0 Live server when updating profiles and scores. There’s a file called “serial” under the Dutch Pinball\brideofpinbot folder and it’s just a text file with the 20 character serial number (with dashes so XXXXX-XXXXX-XXXXX-XXXXX). The serial number should be printed on a label attached to the original BoP hard drive (as shown blacked out earlier). You can edit the file in Notepad and save.
With the backup drive ready, it’s now time to test that the drive was mirrored successfully and the game boots and plays correctly. The mini PC was opened up again and the new SSD was installed into my BoP 2.0. The connectors were put back in to the mini PC and the machine powered on to boot.
The game booted up successfully and several games were enjoyed to ensure everything worked as expected. That’s all there is to it. At least – sort of. I had a few failed attempts with the recovery process, which did restore files to the new hard drive, but it was not in a bootable form. When installed back in to the BoP 2.0 computer, the machine would switch on but then sit at a blank screen or report an error about needing bootable media. I wish I had documented the failures and learning journey to explain and help others solve if they ran in to similar situations while trying to do this. In the end though, the disk cloning and boot issues are Windows / computer related issues (not Pinball) and there is a wealth of information out there that’s helpful. I spent time googling for information which gave me leads and possible solutions to follow. I believe the main issue I faced was the restore by Acronis, which was changing (forcing) the drive partition type on the new Hard Drive to GPT. The BoP 2.0 computer wanted the MBR partition type – which is what the original hard drive was set up with. I found switching to Acronis True Image 2019 (from the 2016 version I started with) sorted the issue out. There were some interesting lessons and knowledge gained along the way 🙂
If you’re wanting to periodically backup the current high scores and profile information, you can simply copy the contents of the \Dutch Pinball\brideofpinbot\{version}\database folder to a USB stick (where {version} is the current active version you’re running). The most recent version at the time of writing this is 1.19. This will ensure that if you have to install the back up drive, you can restore the most recent profiles and settings. Otherwise, when you plug the backup drive in, your profiles will be reverted to the time of the backup. If you want the settings and scores from the original Bride of Pinbot, copy the contents of the \Dutch Pinball\brideofpinbot\[version}\pinmame\nvram folder on to a USB stick also. This is much less important than the full system backup, but still worth doing to retain your profile, audits and score information.
At the cost of a new SSD ($35AU), my BoP 2.0 HDD is backed up in case of failure. I’m leaving the new drive in the game and keeping the original as the backup. What I love about this method is the back up drives are plug and play – so I can very easily get the game running again in case of a hard drive failure / Windows meltdown. I also copied the .tib file from Acronis on to two USB sticks as I can use this file to restore from again if both drives were to ever fail. It’s an extra level of protection. For 2.0 owners, a backup is well worth doing (even mandatory) as there’s no simple way to get your game up and running again if the HDD becomes corrupt or dies. There was a post from Scott (Danesi) on Pinside a few years ago saying that DP do have original mirrors for restoring a BoP 2.0 hard drive if needed (https://pinside.com/pinball/forum/topic/just-pre-ordered-bop-20-kit/page/8) – This is good to hear, but don’t risk relying on someone else. Play it safe – Do your back up!